Procedural Wood Shader | Unity3D
Summary
During the development of our game Zenith Falls, we have learned some amazing new information along the way. Recently we have been playing with Unity’s Shader Graph, and have really enjoyed testing all the endless possibilities that Shader Graph offers.
Our team chose this route instead of using 3D texturing software because it gives our level design team more flexibility, control, and ensures our scenes will always have matching textures.
Today we are going to share how we managed to create procedural wood using shader graph and go into depth on how each Node we use works, so in the future, you can easily make something on your own.
Requirements:
-Unity 2019.3+
-Universal Render Pipeline (URP)
Sections:
- Setup
- Direct Lighting
— Direct Specular Subgraph
— Directional Lights Graph
- Additional Lighting
— Additional Specular Subgraph
— Additional Lights Graph
- Procedural Wood | Master Graph
— Procedural Markings Subgraph
— Cell Shading Subgraph
- End
Downloads:
.hlsl scripts (free)
shaders (Patreon)
Setup
First, we need to set up our shader subgraphs, we have a few tasks that we need to handle in order to make our procedural wood look like, wood.
In a simple list, we have to manage;
1. Direct Lighting
2. Additional Lighting
3. Wood Markings
4. Normals / Cell Shading (depending on style)
So we will be doing two styles, one for toon/anime and the other for more realistic settings.
Direct Lighting
Direct Specular Subgraph
Before we can start we need to handle our Subgraphs within our Subgraphs, “Supgraphception”.
Create a new Subgraph in Unity, call it “DirectSpecular” and open it up to start editing our new graph.
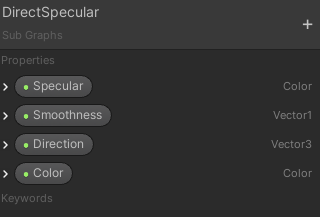
Make sure to match the keywords at the top, it's not the name’s that are important, it's the types on the right. Color, Vector1, Vector3, and Color again.
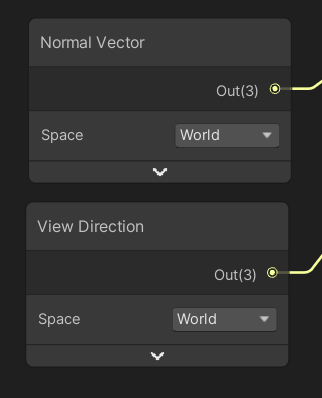
Now create two new Nodes, a Normal Vector Node, and a View Direction Node, both in World Space.
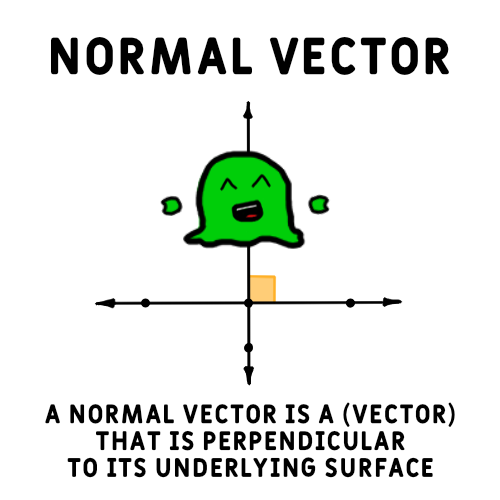
Normal Vector Node: Returns the Normal Vector of our Object.
View Direction Node: From our Vector to the Camera (Camera Direction)
We need to create a .hlsl script in order to help us inside the Shader Graph, this is a script that will manipulate our two values from the Nodes we created earlier. Based on our Direction & Vectors we will create fake lighting.

You will have to create a text file and rename it to .hlsl, then drag that into Unity. You can copy & paste these from then on for faster file creation, our download our source of .hlsl files from the top link.
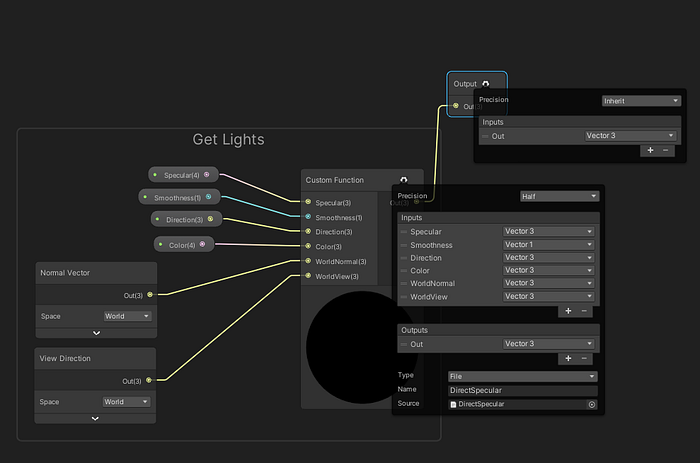
Create a Custom Function Node, connect the “DirectSpecular” .hlsl file to the source, and make sure the type is “File”. Follow the setup in the picture above and make sure the names match as well as the types on the right.
After you have the Custom Node setup, connect the variables to the estimated slots.
Lastly, we need to set up our Output Node, just add a new option, name it “Out” and set it to a “Vector 3”.
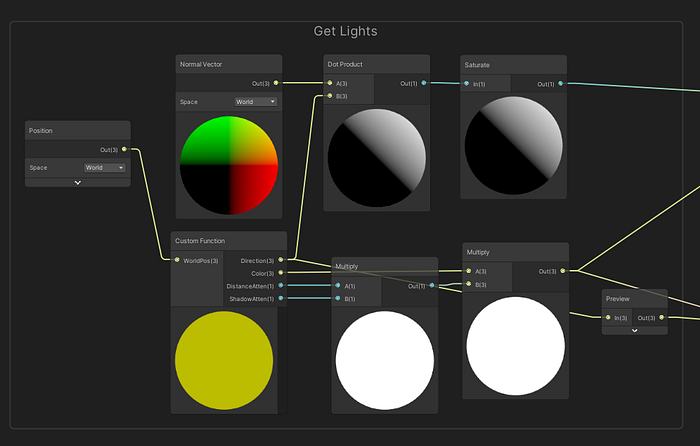
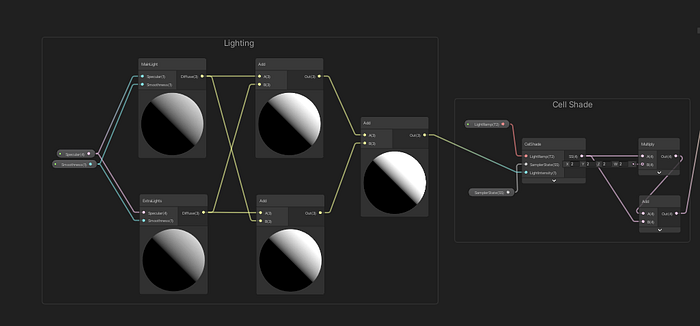
Directional Lights Graph
Now that our Subgraph is ready we can set up our “Directional Light” graph.

Replicate the properties above as two Vector 1’s, named “Specular ”& “Smoothness”.
Next, create another .hlsl script called “MainLight”.
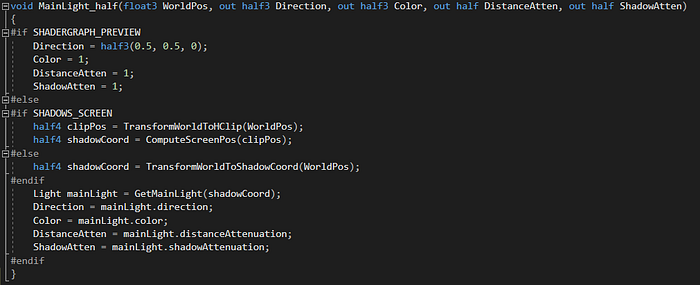
this is another script that will grab our world position and use that to help us create shadow effects based on Attenuation.
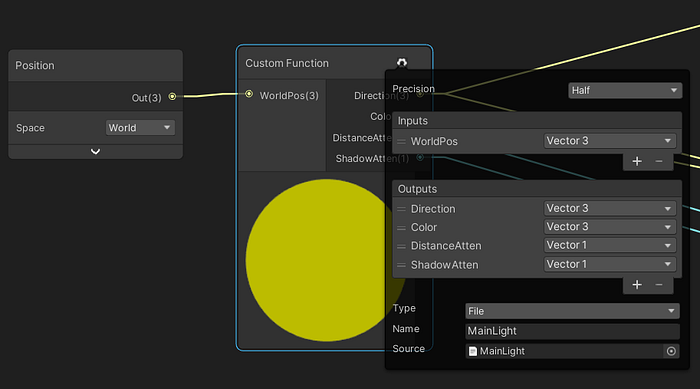
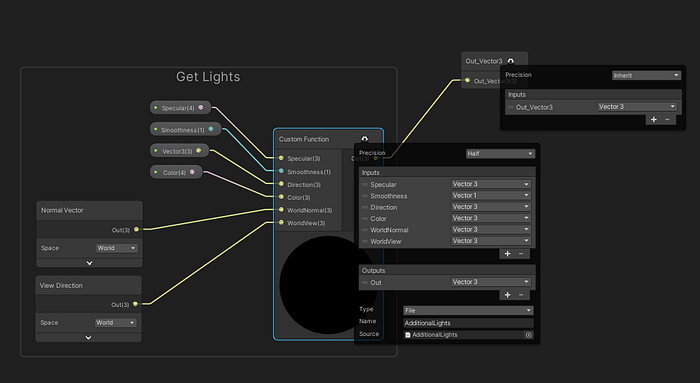
We need to edit the Node again so add one input called WorldPos(Vector3) and four outputs called Direction(Vector3), Color(Vector3), DistanceAtten(Vector1), ShadowAtten(Vector1). Don’t forget to change the precision to “Half”.
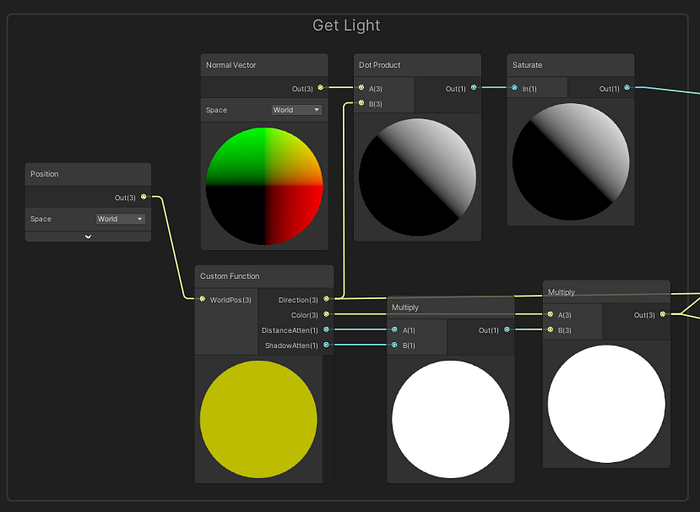
Now the tricky combining, we need to create a Normal Vector and use a Dot Product to find the sum of our two Vectors, Direction & Normal, then drag that into a Saturate Node.

The Saturate Node is a more advanced version of the “Clamp” Node, it assures our value stays between 0–1.
We also need to multiply our “Shadow Attenuation” by our “Distance Attenuation”. Attenuation is only the reduction of a force, effect, or value of something.
Light, sound, and other waves in nature travel at different speeds, when a wave leaves its point of origin, the area of the surface increases with the square of the distance from the source. Meaning that the same wave will continue to grow larger as the energy intensity reduces with the square of the distance from the source (Inverse Square Law).

So “Shadow Attenuation” is multiplied by “Distance Attenuation”, which then is finally multiplied by our Color, to give us a blended intelligent version of light & shadow.

Now we add in our “DirectSpecular” Subgraph, connect “Smoothness” and “Specular ”to their destinated spots, the end of our last Multiply Node to “Color ” & our custom functions “Direction” to a Preview Node, then ending at the “DirectSpecular” Direction slot.
Create another Multiply Node and connect our last Multiply Node to B, then connect the Saturate Node to A. Combine those both to a final Add Node, then set up the Output as a Vector 3 called “Diffuse” and connect the Add Node to our Output.
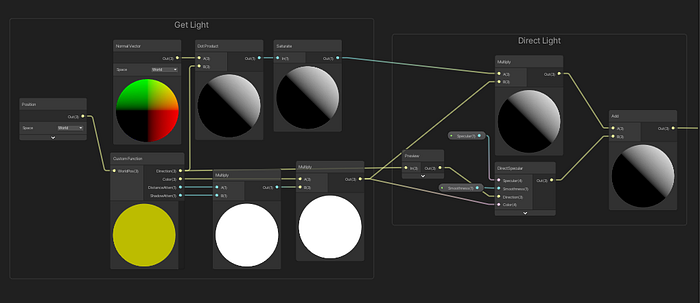
Additional Lighting
Additional Specular Subgraph
We need to replicate the Directional Lighting graph & Subgraphs with small changes in order to give our shader the ability to read extra lights, so create a new Subgraph called “AdditionalSpecular”.
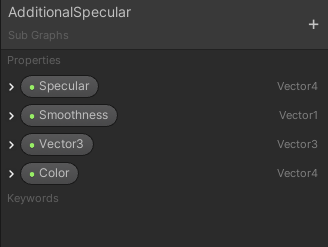
First, let's recreate the variables like before, then we need to create a new .hlsl script and call it “AdditionalLights”.

This is a script similar to the one we used before, with minor changes that create additional lighting added onto our main light.
Fill in the custom function with the same setup as earlier, except with the function name called “AdditionalLights”. Connect to the output and prepare for the next graph!
Additional Lights Graph
Almost near the finish, we need to create another new graph called “Additional Lights”.
This may look familiar, that’s because it is! At this point, you can copy and paste your “Get Lights” category from the “Directional Lights” graph into our new “Additional Lights” graph, we copy the same procedure as before.
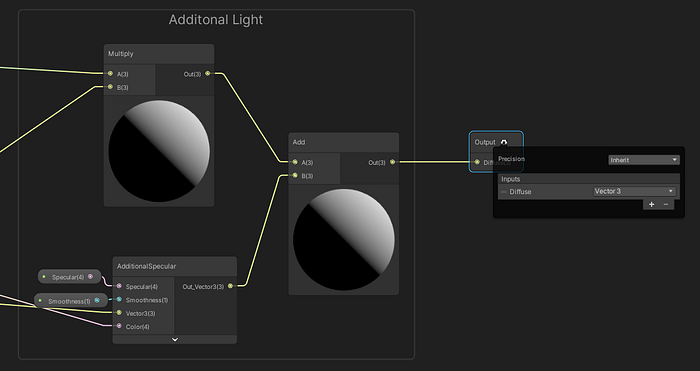
Instead of the Subgraph we used on “Direct Lighting” we are going to add our newly created Subgraph instead, this will create the effect we want.
Procedural Wood | Master Graph
Okay now dealing with lighting is quite a headache, now we can get into the not so difficult part and then blend all our Subgraphs together.
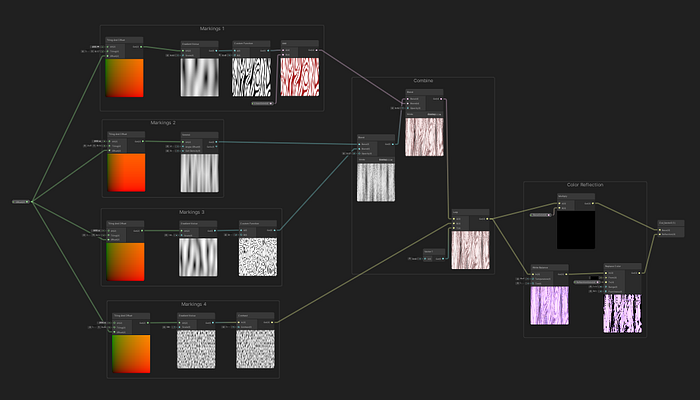
Procedural Markings Subgraph
Create a new Subgraph called “ProceduralMarkings” this will handle creating the shapes in our wood.
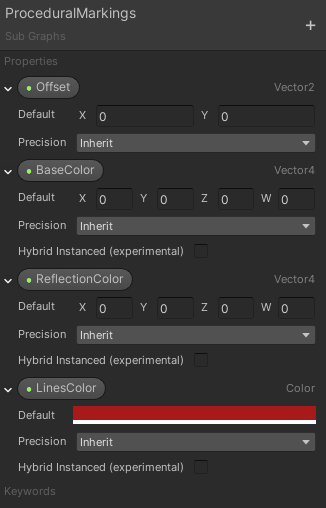
Create the properties you see above, Offset(Vector2), BaseColor(Vector4), ReflectionColor(Vector4), LinesColor(Color).
Vector4 can also be used for color, (R, G, B, A)
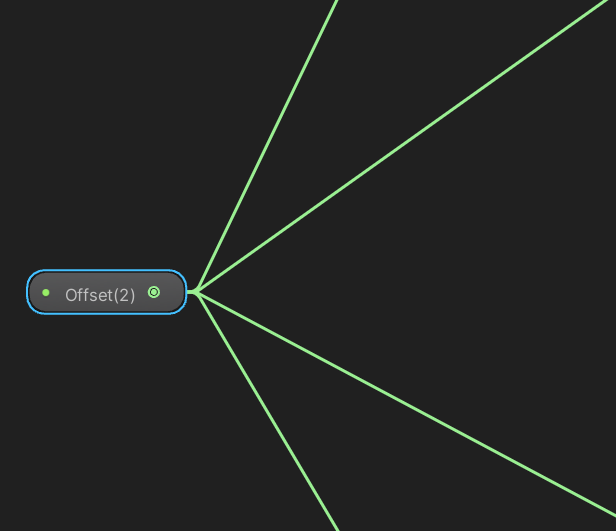
We drag our offset property and prepare to attach it to four Nodes.
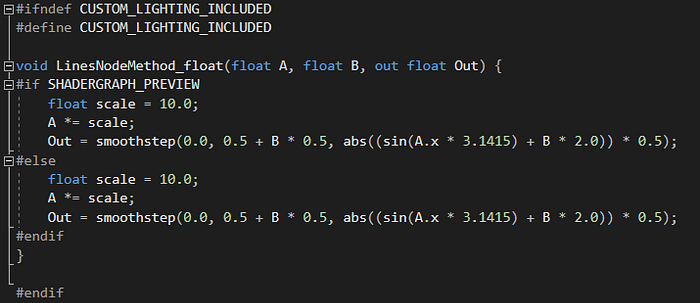
Create our last .hlsl script called “WoodLines”, this will create curved lines the replicate those that appear in the wood from two values that we give.
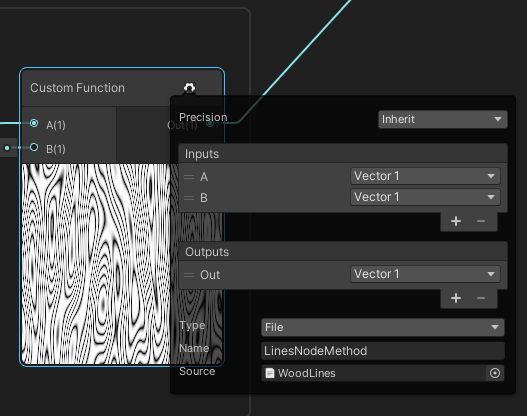
Create your Custom Function Node, setup two inputs A(Vector1) & B(Vector1), then one Out(Vector1). Make sure the name is “LinesNodeMethod”.
Now we have our Custom Function Node set up and ready to be used we can begin creating our wood textures procedurally.
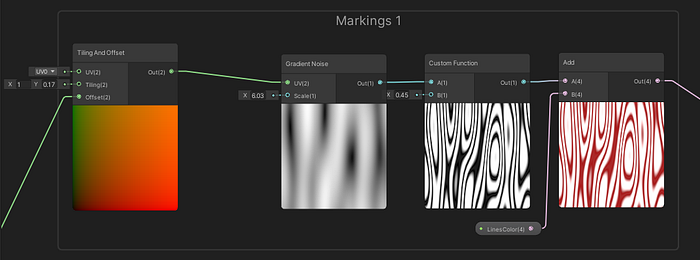
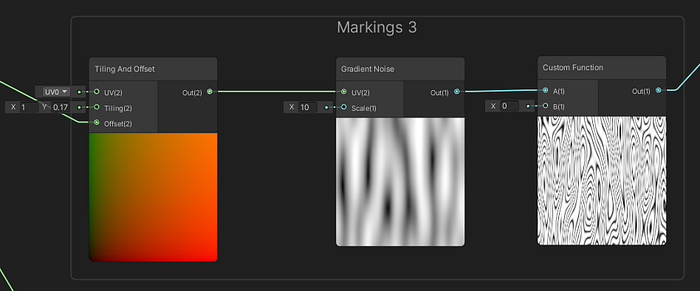
Create a Tiling and Offset Node, this will be connected to our Offset property. Where X is 1 and Y is 0.17, then connect the Out to a Gradient Noise Node in the UV Input, the Scale should be 6.03.
Connecting that to our Custom Function Node in slot A, Slot B should be 0.45. Last we combine that in an Add Node with our LineColor.

Create another Tiling And Offset Node where X is 2.21 and Y is 0.12, attach the Out to the UV slot in a Voronoi Node where X is 2 and Y is 5.
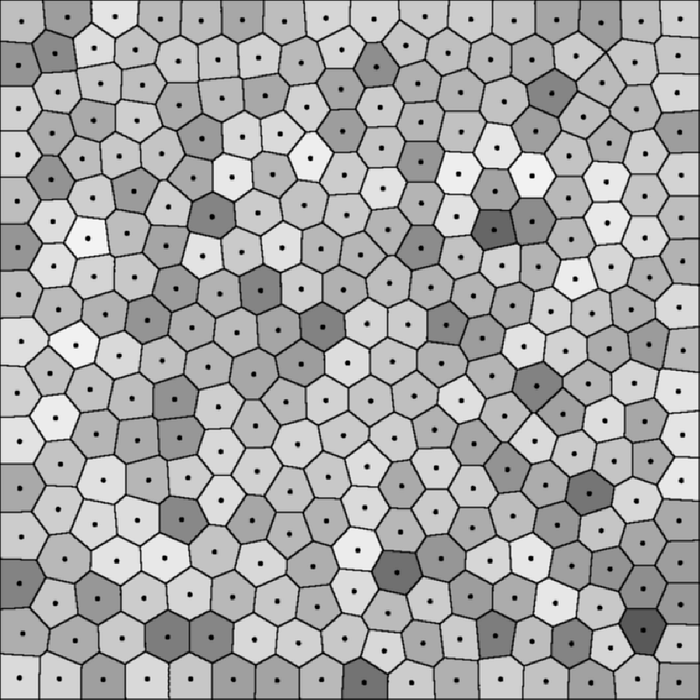
Voronoi is named after Georgy Feodosievych Voronoy who defined the study in 1908. A Voronoi pattern is a random generation of points, these points create lines directly in the middle distance of each other, creating a grid of squished shapes. Voronoi appears in nature, leaves, bubbles, etc.
Creating our third marking, we add another Tiling And Offset Node, where X is 1 and Y is 0.17, attached the Out to the UV slot of a Gradient Noise where the Scale is 10. Copy and paste our last Custom Function Node and connect that to our Gradient Noise Node.
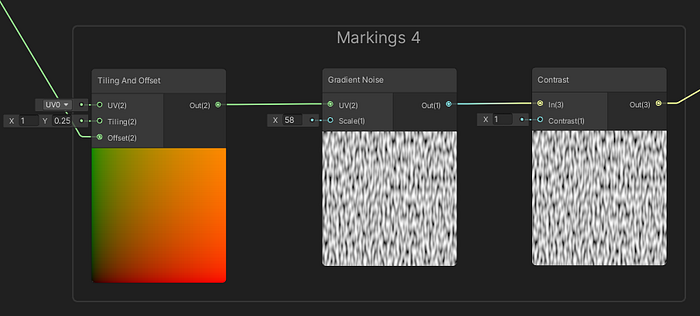
We need one more marking so add our final Tiling And Offset Node where X is 1 and Y is 0.25, attach the Out to the UV slot in a Gradient Noise Node where the scale is 58. Add a Contrast Node and connect our Gradient Noise Node to the In slot.
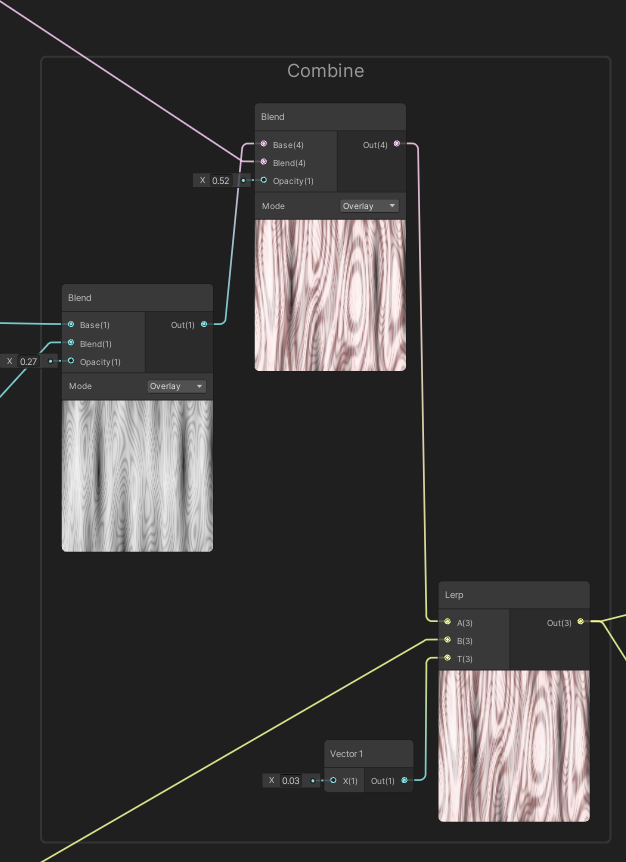
Let's prepare to combine our nodes, add a Blend Node that connects to another Blend Node. Connect the last Blend Node to a Lerp Node where the T is 0.03

Now we can plug in our markings into both of the Blend Nodes to make the magic happen!
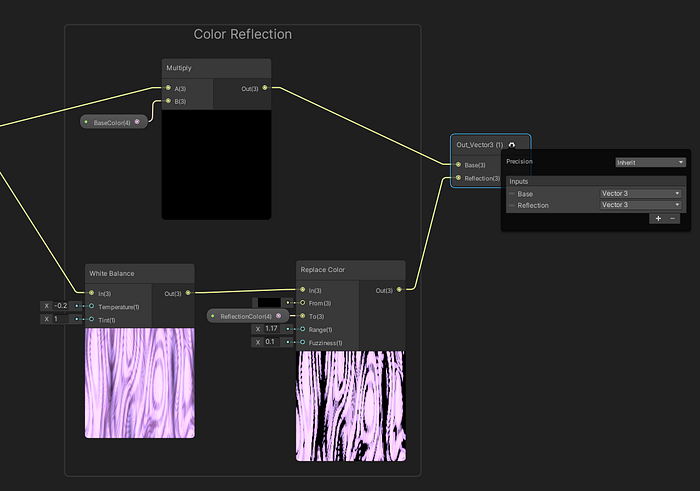
Let's prepare our Out node, so add two new Vector3 Inputs, name them “Base” & “Reflection”.
First pass our markings over by adding a Multiply Node, connect the “Base Color” property into slot B, then connect that into our subgraph output “Base”.
Add a white Balance Node where Temperature is -0.2 and Tint is 1, attach the Out to a new Node called Replace Color where the Range is 1.17 and the Fuzziness is 0.1, add the Out to our “Reflection” Output.
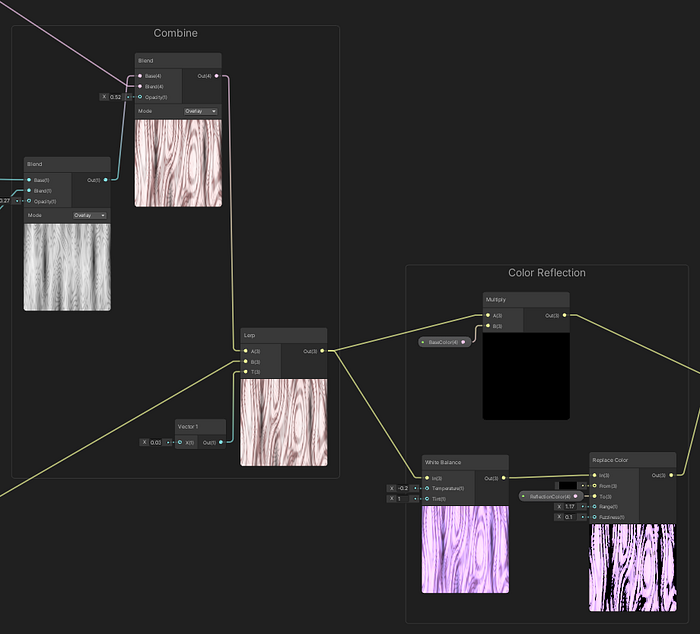
Connect our Lerp Node to both our Multiply Node and White Balance Node to finish the connection.
Here is an overview of all our Nodes combined.
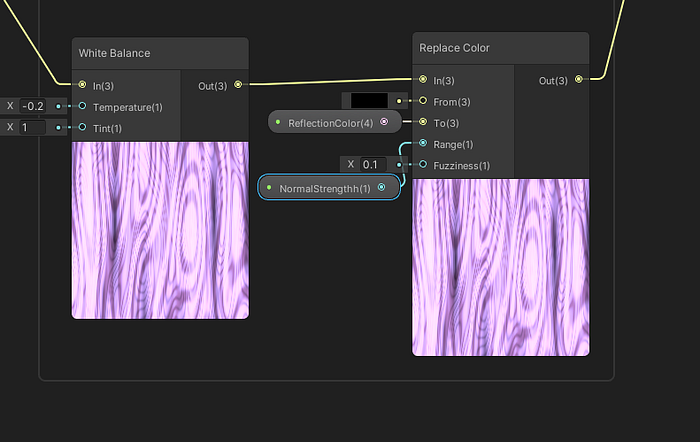
If you are trying to make a realistic look, add a new property called “NormalStrength” and add that into “Range”.
Ignore our typo in the picture!
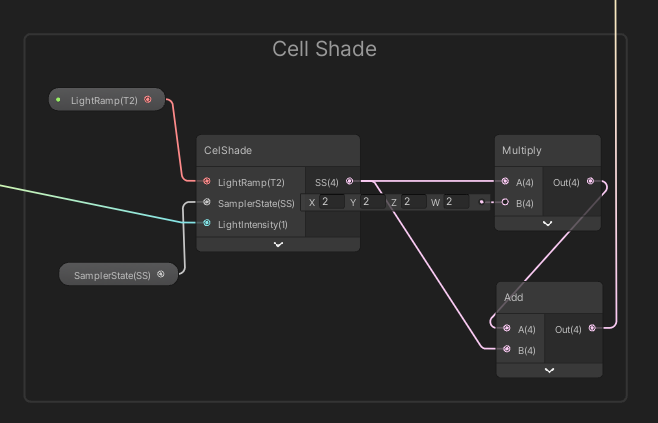
Cell Shading Subgraph
If you're creating our Anime/Toon version of the wood, keep reading, if not you can skip this part.
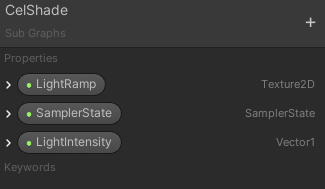
Copy down our parameters, don't forget the SamplerState!
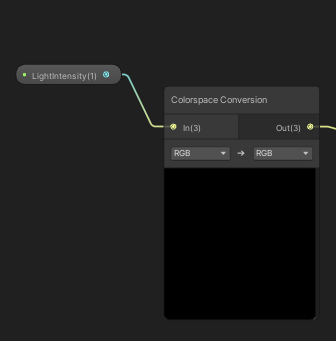
Add a new Colorspace Conversion Node and drag our Light intensity into the In slot.
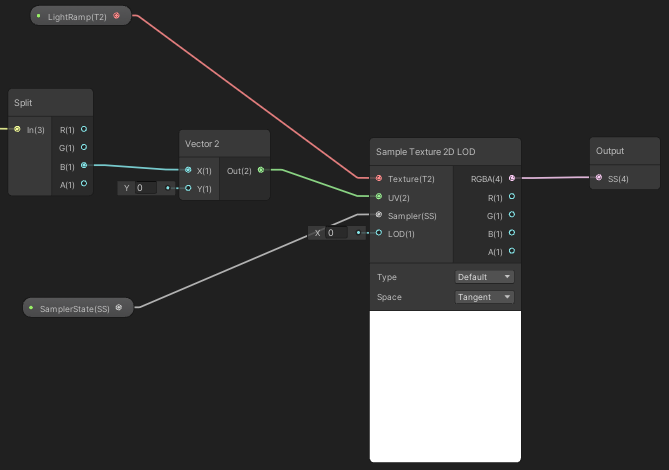
Create a new Split Node and drag the B output into a Vector2 Node in the X slot.
Connect our newly created UV into a Sample 2D Texture Node UV, attach the Sample State, and LightRamp to the estimated areas, make sure the Type is Default and Space is Tangent.
Create a new output called “SS” as a Vector4 and connect the RBG values to it.
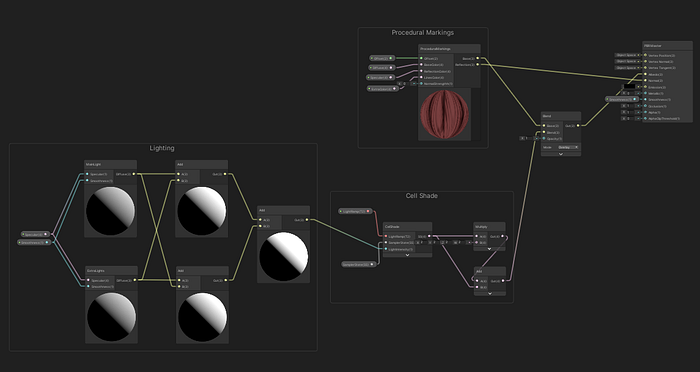
Master Graph
Now is the moment of truth! Prepare for the creation of our final graph! Create a new PBR Shader Graph, depending on what style you're going to name your graph either “AnimeWood” or “ProceduralWood”, use your imagination for this one.
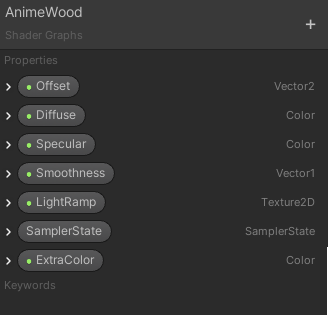
We need to copy down the parameters one more time, so make sure we have them all matching the types on the right.
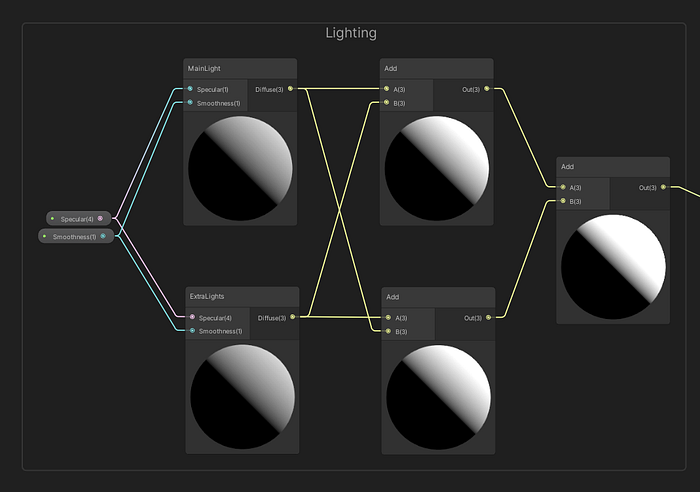
Add both our AdditonalLights & DirectionalLights subgraph, drag in our two parameters “Specular ”& “Smoothness”, then connect these into their matching named spots.
Connect the diffuse output to our A slots in both Add Nodes, then connect the diffuse slots in each opposites B slot.
Create one more Add Node and combine both Nodes.
If you are making an anime/toon shader we need to add a simple version of CelShading.
Add our Cell Shading subgraph Node, Drag our properties LightRamp and SamplerState into their matching slots. Then attach the Output SS to a multiply node where B is (2,2,2,2).
Connect the Multiply Node and the CelShading Subgraph Node to an Add Node, then connect our Multiply Node to the Add Node B slot.

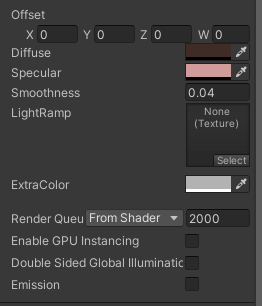
Add our ProceduralMarking Subgraph Node and connect our parameters Offset, Diffuse, Specular & ExtraColor.

If your using the realistic version of this shader, we add a Normal From Height Node and connect our Reflection Output into the In slot.
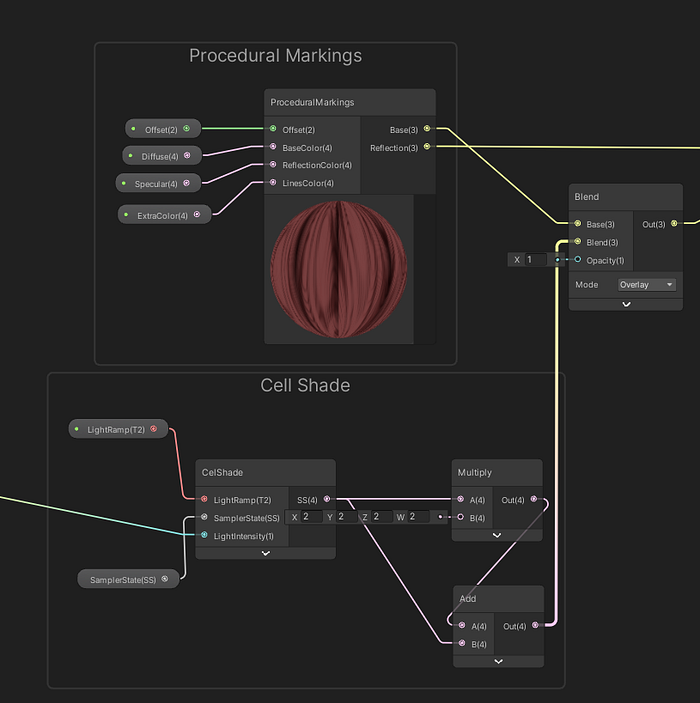
Depending on your setup we only have to combine our nodes now using the Blend Node.

Once we have added everything into the Blend Node we drag the Out slot into our Albedo slot in the PBR Master.
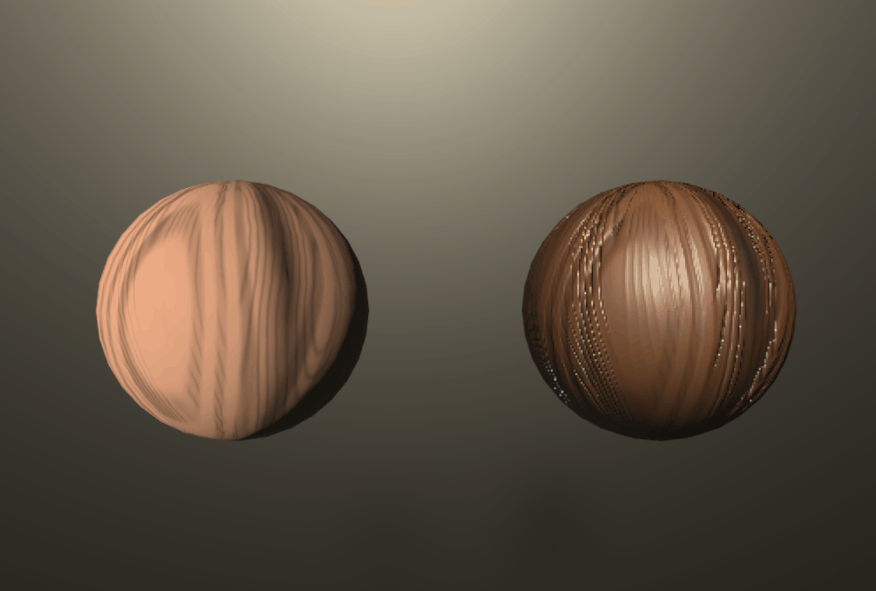
Above is what the toon/anime shader final should look like

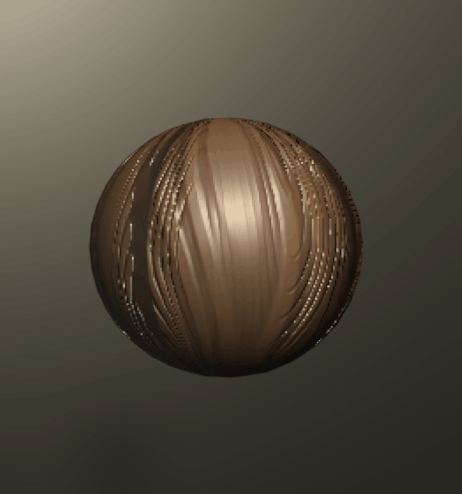
This is what the realistic shader final should look like
Finished
Phew. Finally, we can create new material and drag that onto our scene to use and control the values.
For our anime shader, we chose to not use a LightRamp, which is why we don't have a detailed section on that, we plan to play with Light Ramps more in the future and will return later once we know more!

Join us on Discord to be apart of our games, ask for help on tutorials or just to game with us!
Goop will always be here to share his knowledge, get VIP information from goop on his official Patreon! You can find all the downloads there as well :D